Loading... # 安装anaconda 参考:[链接](http://type.zimopy.com/debian/885.html) 根据上面的安装完anaconda后,下面开始配置jupyter # 安装Jupyter ```bash conda install jupyter ``` # 生成配置文件 ```bash jupyter notebook --generate-config ``` 会出现一个警告信息,后面就是我们需要配置的文件路径 # 生成密码 ```python #先安装notebook包 pip install notebook 在python环境执行代码 这里注意失败情况 from notebook.auth import passwd passwd() 或直接在服务器执行(可靠性高) from notebook.auth import passwd; print(passwd()) 不成功的话就用下面的 from jupyter_server.auth import passwd passwd() 或直接在服务器执行(可靠性高) python -c "from jupyter_server.auth import passwd; print(passwd())" #或者直接先打开jupyter运行代码也可以 运行后会提示输入密码和确认密码 例如: Enter password: ········ Verify password: ········ 'argon2:$argon2id$v=19$m=10240,t=10,p=xxxxxxxxxxxx' ``` # 直接脚本配置 ```python from notebook.auth import passwd import os ## 代码有待测试 home_path = os.path.expanduser('~') cfg_path = f"{home_path}/.jupyter/jupyter_notebook_config.py" if not os.path.exists(cfg_path): os.system("jupyter notebook --generate-config") key = passwd() port = input("port(default:8888): ") or "8888" with open(cfg_path, "r") as f: data = f.readlines() modify = { "c.ServerApp.ip": "c.ServerApp.ip= '*'\n", "c.ServerApp.password": f"c.ServerApp.password = '{key}'\n", "c.ServerApp.open_browser": "c.ServerApp.open_browser = False\n", "c.ServerApp.allow_root": "c.ServerApp.allow_root= True\n", "c.ServerApp.port": f"c.ServerApp.port = {port}\n" } for i, j in enumerate(data): for k in list(modify.keys()): if k in j: data[i] = modify[k] modify.pop(k) with open(cfg_path, "w") as f: f.writelines(data) ``` # 开始设置配置文件 ```yaml ## The IP address the notebook server will listen on. # Default: 'localhost' # 设置可以访问的ip, 默认是localhost, 将其改为 '*' c.ServerApp.ip = '*' ## DEPRECATED, use root_dir. # Default: '' 默认打开目录 c.ServerApp.notebook_dir = '/home/huoyu/huoyu_python' ## Whether to open in a browser after starting. # The specific browser used is platform dependent and # determined by the python standard library `webbrowser` # module, unless it is overridden using the --browser # (ServerApp.browser) configuration option. # Default: False 启动后是否打开浏览器, 设为 False 即可 c.ServerApp.open_browser = False ## DEPRECATED in 2.0. Use PasswordIdentityProvider.hashed_password # Default: '' c.ServerApp.password = 'argon2:$argon2id$v=19$m=10240,t=10,p=xxxxxxxxxx' ## DEPRECATED in 2.0. Use PasswordIdentityProvider.password_required # Default: False 是否启用密码,改成了True c.ServerApp.password_required = True #允许root运行 # Default: False c.ServerApp.allow_root = True ``` ## 也可以参考 ```ini 修改配置文件: 配置允许访问的IP,*代表所有IP均可访问:c.ServerApp.ip= '*' 配置jupyter lab运行端口:c.ServerApp.port=23 启动时是否打开浏览器:c.ServerApp.open_browser=False 文件夹根路径(需手动创建目录):c.ServerApp.root_dir='/root/code' 设置是否需要密码:c.ServerApp.password_required=False 设置连接时的token,此时表示不需要token:c.ServerApp.token='' 需要密码时设置密码:c.ServerApp.password='xxxxxxx' 允许跨域访问:c.ServerApp.tornado_settings={'headers':{'Content-Security-Policy':"frame-ancestors self *"}} ``` # 启动jupyter ```bash jupyter notebook --ip=0.0.0.0 --port=9999 --allow-root ``` # 扩展插件 ## **1、安装jupyter_contrib_nbextensions** 该插件会扩展jupyter的很多功能,如目录,自动补全等,在服务器终端依次运行如下命令 ```bash pip install jupyter_contrib_nbextensions jupyter-contrib-nbextension install --user ``` 打开jupyter会发现多了一个菜单栏 `Nbextension` 对Nbextension进行配置,勾选需要的功能 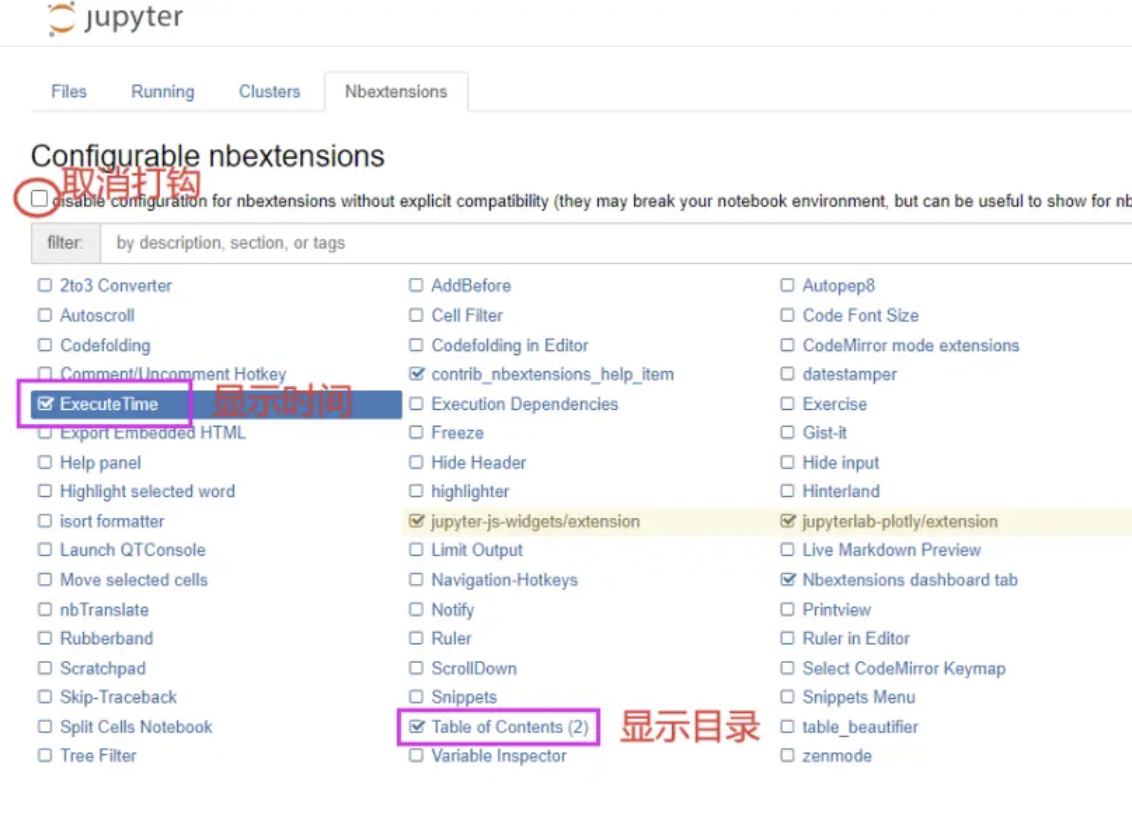 ## **2.安装nb_conda** ```bash conda install nb_conda ``` 运行这个可能会出现高版本的python无法安装,查看下面总结的报错情况去解决 安装完成后,需要在服务器重新启动一下Jupyter notebook,会发现多了一个菜单栏 `Conda` 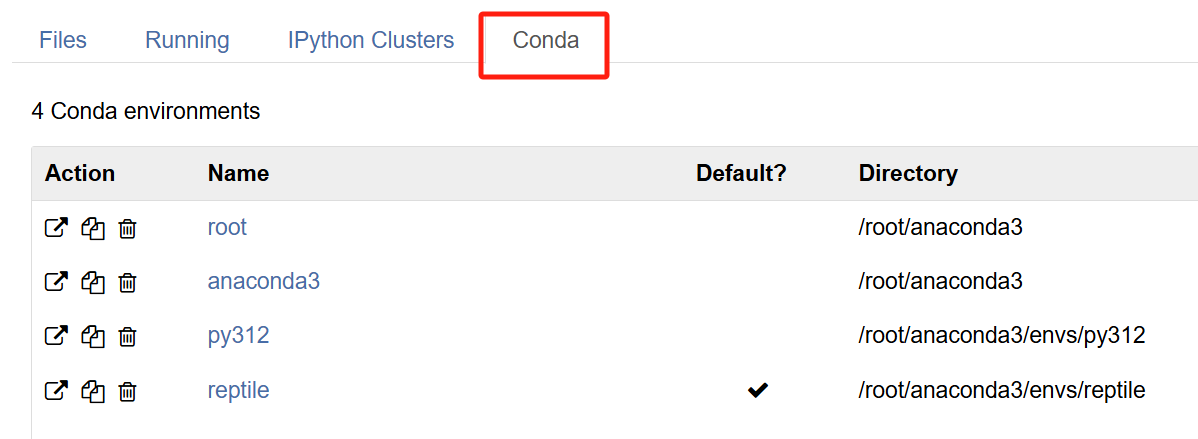 # 多个Python版本kernel配置 虽然上面已经创建了虚拟环境,并显示出来了,但是在创建新的notebook时并显示python312,因为python312存在不同的虚拟环境里面,这个需要我们再进行配置 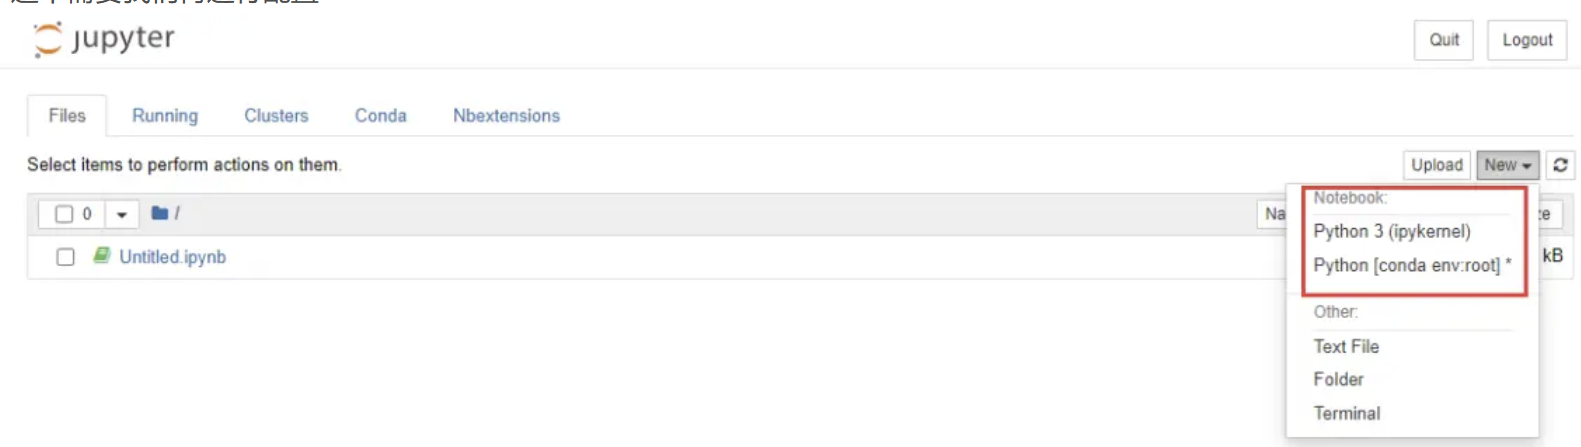 Jupyter Notebook允许用户在同一个notebook中使用多个不同的IPython内核 * **1、安装Jupyter Notebook和IPython内核** ```bash conda create -n python312 python=3.12 #上面安装过的可以忽略 conda activate python312 pip install jupyter pip install ipykernel pip install ipywidgets ``` * **2、安装新的kernel内核** ```bash conda activate python312 #切换虚拟环境 ipython kernel install --name "python312" --user ``` **3、服务器端重新启动Jupyter notebook** 建一个python312内核的notebook,查看当前内核的python解释器版本 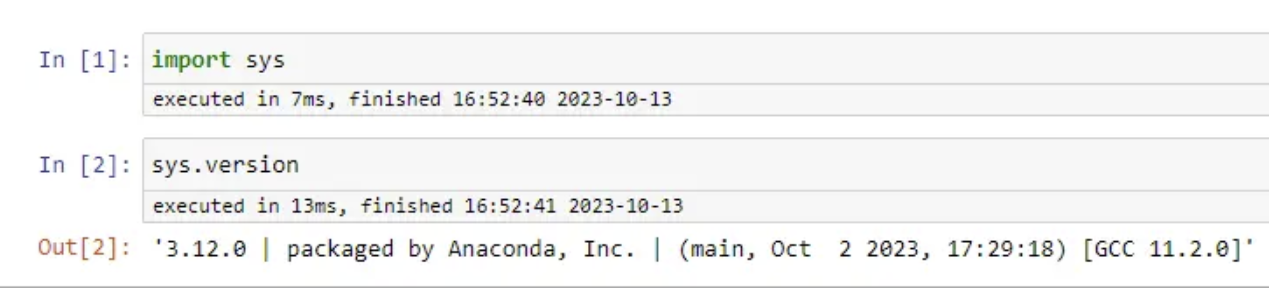 # 报错情况 > 先升级pip ```bash pip install --upgrade pip ``` ## 第一种 WARNING: Running pip as the ‘root‘ user can result in broken permissions ```bash # 原始目标:pip install package # 用自己要pip的包替换【package】 pip install --root-user-action=ignore 【package】 ``` ## 第二种 ``` Could not solve for environment specs The following packages are incompatible ├─ jupyter is installable with the potential options │ ├─ jupyter 1.0.0 would require │ │ └─ python >=2.7,<2.8.0a0 , which can be installed; │ ├─ jupyter 1.0.0 would require │ │ └─ python >=3.10,<3.11.0a0 , which can be installed; │ ├─ jupyter 1.0.0 would require │ │ └─ python >=3.11,<3.12.0a0 , which can be installed; │ ├─ jupyter 1.0.0 would require │ │ └─ python >=3.5,<3.6.0a0 , which can be installed; │ ├─ jupyter 1.0.0 would require │ │ └─ python >=3.6,<3.7.0a0 , which can be installed; │ ├─ jupyter 1.0.0 would require │ │ └─ python >=3.7,<3.8.0a0 , which can be installed; │ ├─ jupyter 1.0.0 would require │ │ └─ python >=3.8,<3.9.0a0 , which can be installed; │ └─ jupyter 1.0.0 would require │ └─ python >=3.9,<3.10.0a0 , which can be installed; └─ pin-1 is not installable because it requires └─ python 3.12.* , which conflicts with any installable versions previously reported. Pins seem to be involved in the conflict. Currently pinned specs: - python 3.12.* (labeled as 'pin-1') ``` 解决方法: ### 方法一 安装指定版本的jupyter ```bash conda install python=3.11 jupyter ``` ### 方法二 降低创建的python版本到3.10即可 ## 问题三 报错[ipyparallel](https://github.com/ipython/ipyparallel)需要安装 ```bash pip install ipyparallel ``` 采纳文章:[链接](https://blog.csdn.net/zhangtingduo/article/details/133945890) 最后修改:2025 年 07 月 01 日 © 允许规范转载 打赏 赞赏作者 支付宝微信 赞 如果觉得我的文章对你有用,请随意赞赏
